Musings on, Art, Skinning, Computers, and the True meaning of Life. (AKA The Lego Theory)

On Day 3 we created the new Closed Folder icon, and then on Day 4 we took that folder and created our Open Folder. Today we will take it even further and use our Open Folder to create our Windows Vista Live Folder.


Day, 5
(Friday, August 8th, 2008) Line

In Windows Vista, if you have your folders displaying at any size above 48x48, just about any folder you see is a Live Folder. These folders are one of the more useful and visually appealing new features in the Vista UI, however they have created a few problems for those of us who dabble in OS customization.

What makes a Live Folder?
Live Folders are actually made up of two (2) separate icons; the Folder Front and the Folder Back. The "Live" part of a Live Folder is the dynamically generated thumbnails that are sandwiched between them. To create a good Live Folder you have to take into account the dynamic aspects that you cannot at this point change. Over the last year I have dealt with this is several ways. After a few experiments I created a simple guide that allows me to make sure that we don't lose those dynamic thumbnails, or end up with them looking out of place.
IaD_5_Live_Folder_Samples 
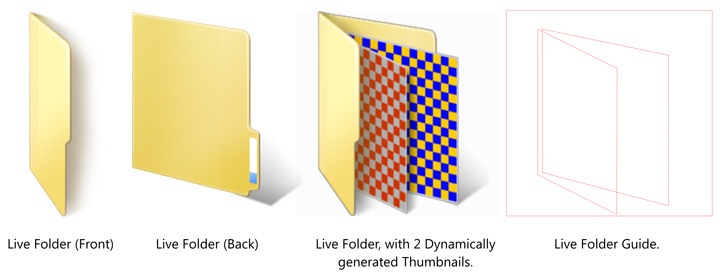
There are several things to note in the above images, that will make sure that our new Live Folder work flawlessly in Vista.

First, you will notice that both the front and back images have built-in shadows. The back is the most strange, in that it has a shadow of nothing shooting off the side. This is because Windows does not use the Live Folder unless there is something in it that can be thumbnailed. If it is empty it will use the Closed Folder icon. If the folder only has one item in it, it will generate the rear thumbnail first. This makes sure that there is always something casting that shadow. It will also right-justify it to make sure that even if it is thin and tall it will cast the shadow correctly. You will also note that the shadow on the front is very feathered and ends before it would hit the first thumbnail. This is to make sure that the shadow does not have to fit correctly on the thumbnails.

The next thing you have to account for is the fact that the foremost thumbnail generates its own shadow. This is one of the reasons you pretty much always have your shadows falling to the right in Live Folder icons. Though you can not tell in the images above, Windows will distort the thumbnails if they are to small, tall or thin to make sure that it's shadows still fit.

Lets us make our own:
You might recall that I used this guide yesterday when creating our Open Folder icon. I did this because I want our Live Folder and Open Folder icons to appear exactly the same to the user. It will also make today's icons very simple to create, since we did almost all the work yesterday.

Step 1: 
The first thing we will do is make two copies of our Open Folder icon from yesterday. I will also be copying my guides, just so we can keep track of where the thumbnails will be generated. 
IAD_5_S1

Step 2: 
Now we simply remove the front of the folder from one, and the back from the other.

  IAD_5_S2

Step 3:
Now we will have to tweak the shadows a bit to make sure that everything feels correct with the thumbnails.


IAD_5_S3

Step 4:
Today I am going to go a bit further with our tutorial and go all the way to applying these in IconPackager. In order to do this we must get our icons created. I do this by exporting them to PNG format; I like to export them as a large 768x768.
IAD_5_S4

 Step 5:
Now we use any number of icon creation programs to turn our PNG's to ICO files. I tend to use Stardock's IconDeveloper, or Axialis Icon Workshop, depending on what I need to do. Make sure you include the Vista 256x256 icon size.

IAD_5_S5

Step 6:
Once we have our icons, we simply open IconPackager, click on the Icons & Cursors tab, and chose Folders. Then simply drag and drop your new icons on the Live Folder Front and Back.

Chose Apply My Changes and you are good to go.


IAD_5_S6

Finished Icon:
Now we have our own Icon-A-Day style live folders, and if you don't mind that the live folders are vertical, you can now apply these to the Icon-A-Day 1.1 icon package and have pretty much a complete Vista set.

IAD_5_Finished

Wrap Up:
With the completion of the Live Folders we come to the end of Week 1 of the Icon-A-Day 2.0 project. I will be back Monday night, when we will do our last non-user folder, the new Vista-only Data Folder.

I would like to thank everyone for the welcoming back the Icon-A-Day project so warmly. With your support, we should be able make the Icon-A-Day 2.0 icon package a must-have.


Download the Live Folder Icons: 
Get today's Icons form the Miscellaneous Icons Library.
IAD_Download

All Icon-A-Day artwork, copy, and Icons, are copyrighted by Paul Boyer © 2008, and may not be used with out express permission.


Comments
on Aug 08, 2008
Coolio!
on Aug 08, 2008
Thanks for the Icon-A-Day 2.0 tutorials, Paul, they are proving to be really helpful to me.

I'm particularly enjoying this segment as I am attempting to make some folder icons so I can make a more complete (Vista ready) Iconpackage to go with the Pirate and Medieval icons I made for the misc and OD galleries. The thing is, they were just cuts and crops from various photos because I'm a complete noob when it comes to graphics creation, etc, not to mention being a novice with the (PSP X1) program I'm using, so I will learn and greatly benefit from your expertise here.

Hopefully be able to upload some halfway decent Iconpackages someday.
on Aug 09, 2008

A-m-a-z-i-n-g! I never cared myself about Desktop Icons, but it seems I got infected now


-Stefan

on Aug 10, 2008
This is a really good explanation of live folders. Probably the easiest to understand that I have seen. It will definitely help me. Question. Could you expound on how you choose your sizes for export and why. Is there a reason or just personal preference?
on Aug 10, 2008
The most import thing is that they are square, if you are ueing photoshop, or some other pixel based porgram you can do them at 256x256 if you want. I use a Vector Based App, so techniquly I could save tham out at any size. I tend to dsign my stuff with a scale of 1"=100 pixels. But I tend to export at 300dpi. So I end up with a exported size of 768x768, for a 2.56" square. This is about as big as I ever go. But the truth is its all about the design. If you design something to be supper detailed at 768, it will most likely look like crap at 48x48.
on Aug 11, 2008
soo great!
on Aug 11, 2008
Thanks mormegil. That is a good way to look at it. I had noticed that many posted PNG's for say Object Dock icons were at 256x256 at 96dpi when I looked at the properties. I like the way you explained the "square" and just wanted to get another opinion. Thanks for taking the time to give me another outlook on a good way to size. And again, these tutorials are tremendous. Thanks.