 Today we will dive back in to the core user folder with the Music folder. We will be basing it on our Original Icon-A-Day My Music Folder, and will be using almost the same exact steps. However, because of the change in folder size, we will need to recreate almost all the assets for our 2.0 version. Today we will dive back in to the core user folder with the Music folder. We will be basing it on our Original Icon-A-Day My Music Folder, and will be using almost the same exact steps. However, because of the change in folder size, we will need to recreate almost all the assets for our 2.0 version. |
Day 13 (Thursday, August 21th, 2008)  |
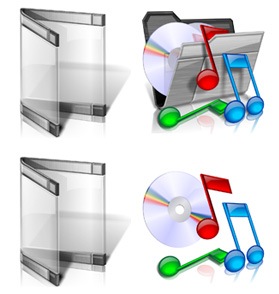
|  The Music folder The Music folder
The original Music Folder was one of my favorite icons in the Icon-A-Day series. It was one of the first special folders we did, #5, and it set the standard for the overall look of the folders in the pack.
I want to do pretty much the same type of thing with the 2.0 version. We will do a nice disc or two in the folder, and scatter in some pretty candy-like notes. We might even be able to salvage a few assets, however I am going to take this opportunity to show how we make the notes, as well as the disks. We will be doing this in almost exactly the same way as we did them 3 years ago, so I recommend that if you have any questions I don't cover here that you take a look at the original tutorial.
|
| Step 1:
We can start once again by grabbing our Wrapper folder, and our original Music folder.
Then we remove the assets that we will not be able to use.
 | Step 2:
I keep all the notes and the CDs, though I don't know if we will be able to use them. I mostly want to be able to use them to copy effects and fills from them, while we create our new assets.
That said, I quickly create new ones as simple objects, using circles and boxes.
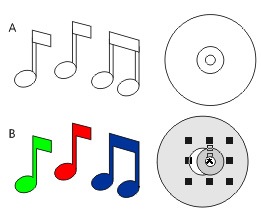
When I have the shapes, I weld the notes together. I also combine the circles together, creating an inner and outer ring for our disk. | | Step 3:
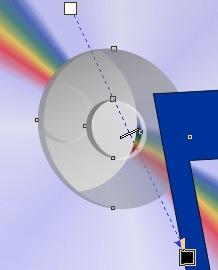
Before I go any further, I group our two disk circles together, so that I can apply a perspective to them.
Now I use the Perspective tool to quickly give our new notes new perspectives. I also do the disk at this point.
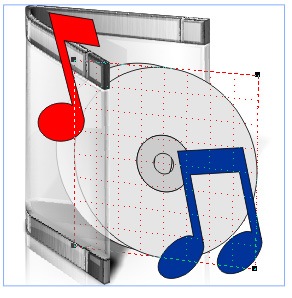
Now it looks like we won't have enough room to get our green note in without crowding the composition. This frees us up to move on to our fills. We will start with the CD. | Step 4:
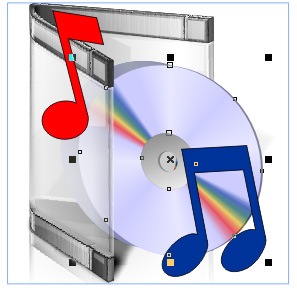
I give the main body of the CD a nice Conical Fill, copying the colors from our original CD. Then I give the center ring a gray to white liner gradation.
I give the same fills to the rear disk, however when I'm done I tint them 2 clicks black, to darken them up.
Then I copy both rings one more time, move them behind the originals, and over to the right a bit, to create the illusion of thickness. I also tint these a little darker.
 | | Step 5:
Now we need to make the inner rings of the disks transparent, which we do using the Interactive Transparency tool, and give them a liner transparency.
At this point we need to use our front circle to crop the copy of it we made in step 4, so we can have a lip yet be able to see through the "Glass." We need to do this twice, once for the inner lip, and once for the outer lip.
We do the same thing for the rear disk.
 | Step 6:
Before we give the discs gloss or shadows, we will go ahead and move on to the music notes.
We will be doing them with mesh fills and blend groups. We start with the blend. First I draw a fresh ellipse over the bulbs of our notes. Then I copy that ellipse and make a smaller version, down toward the bottom of the other. We make the larger one the same color as our note, and the smaller one a lighter blue.
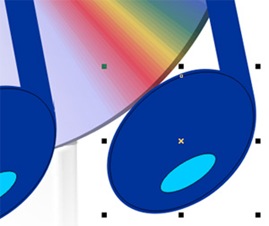
Now we just blend the two ellipses together. | | Step 7:
Next we draw two new mesh rectangles to give that glossy look to the rest of the note.
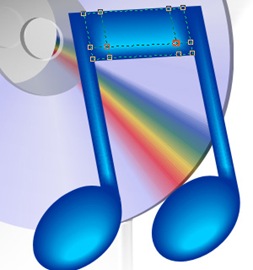
When we are done with the blue note we do the same thing on the new red note.
| Step 8:
Now we need to go through all of our new shapes and create new gloss, which we do this with our standard gloss technique. We have to be careful to crop some of the gloss on the Wrapper folder where it would be occluded by our new objects. 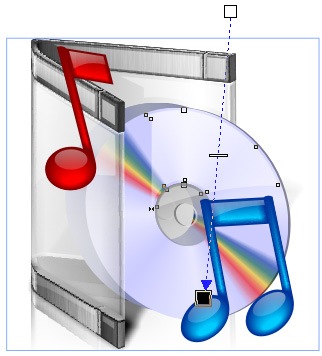 | | Step 7:
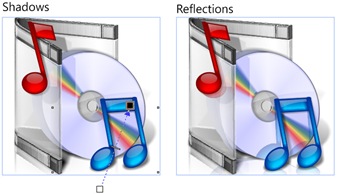
Once again our last step is the Shadows and Reflections. These are a bit more difficult than normal, because we have a lot going on, and several reflective surfaces to keep in mind. See shadow and reflection techniques for more.
 | Finished Icon:
Here we have it, the new Music folder. I think it stands up well when compared to our original.
 | |
Wrap Up:
With the completion of the Music folder we are over half way through the User folders. Tomorrow we will end the week with a Videos folder. Who knows, we might even be able to do it in a Video.
About Me:
You can find all my skins, tutorials, and articles, on my Wincustomize Homepage, at http:\\mormegil.Wincustomize.com. Questions on icon use and techniques, can be emailed to mormegil@gmail.com. Twitter users can find me with the user name: Mormegil.
|
Find all the Icon-A-Day tutorials, and links to the icons and more at the Icon-A-Day 2.0 Index.
All Icon-A-Day artwork, copy, and icons, are copyrighted by Paul Boyer © 2008, and may not be used with out express permission. |